
Assembly guide
Building your 21 Cube
Exactly how a 21 Cube goes together, step by step, with sketches. Read it before you buy so you know what you're getting into — most owners build the shell in 3–5 hours with two people.

At a glance
What the build takes
2 people
It goes smoothly with two. A third helps, especially when you stand it upright.
3–5 hours for the shell
Plus another 3–4 hours for sealant, roofing and the interior.
Basic tools
A rubber mallet, a cordless drill, a tape measure and a ladder. Screws are included.
9 kW · 240V · 50A
The heater needs a dedicated circuit, wired by a licensed electrician. A wiring diagram is included.
How it goes together
The boards (we call them staves) run front to back and form a closed ring. Each one has a curve-out edge and a curve-in edge that nest together. Each end wall is three sections that go on one at a time as the floor grows across. Counts and sketches here are for the Medium and Large; the Small uses a different stave count.
Stave count · Medium & Large
| Stave | Qty | Where it goes |
|---|---|---|
| Wide | 56 | 14 on each flat surface: floor, left wall, right wall, roof |
| Thin (corner) | 44 | 11 around each of the 4 rounded corners |
| Keel | 1 | Middle of the floor · curves out on both edges |
| Crown | 1 | Middle of the roof · curves in on both edges |
| Total | 102 |
The Small uses a different count. Its numbers are coming soon; the steps and sketches here show the Medium and Large.
Anywhere the surface curves, use the thin boards — 11 per corner. The flat runs — floor, side walls, roof — take the wide ones, 14 per surface. If your count runs a little long or short, make it up at the middle of the roof, where nobody sees it.
Why the curve-out faces up
On the side walls, each board's curve-out edge points up and the next board's curve-in edge sits over it. Water running down the outside can't collect inside a curve, so it sheds off instead of soaking into the joint.
What you'll need
- Rubber mallet — required. Every board is built to fit snug and gets tapped into place.
- 2 people, 3 is easier.
- Cordless drill/driver. Screws are included, one at each end of every board.
- Tape measure for setting the first board level.
- Step ladder — you'll be on top of the sauna for the last roof boards, the straps and the shingles.
- For the roof: utility knife, staple gun or roofing nails and hammer (not included).
- For sealing: one gallon of sauna-safe sealant and a wide brush (not included).
- Padding for the glass sections, and a flat work area.
- Phase A · Floor, on its side
-
Set up the first two sections
Don't join the end walls yet. Start with the back section that has the power box on it — the unit that runs the heater, lights and speaker is already mounted to it, and its cable comes out at the back bottom, which tells you the orientation. Pair it with the matching front window section.
Pick the right window: the two front windows aren't interchangeable. Check which side of the door each one lines up with at the metal peg connectors. The door also has a smaller gap at the bottom, the step-over, which tells you which way is up.
Stand the two sections facing each other, one stave-length apart, with the obvious curved edge on the ground.
End view · sauna on its side, curved edge down, floor edge facing right -
Set the first stave level
The first stave sets the line for everything after it. Put it on near the top, drive one screw into the first section, then measure from the ground to it. Go to the other section, measure the same height, and screw that end in.
Now your first stave is straight and square across, and you can work up and down from there.
Same measurement at both ends -
Work up and down from that stave
Add staves above and below the first one until you have enough done to hold its shape — around the first bottom corner (11 thin staves) and onto the floor. Seat, tap both ends, screw.
New: 11 thin staves on the first corner, 4 wide on the floor -
Add the door section and the back center
Once the floor reaches the middle, add the door. It connects to the window section with two square metal pegs: press them in, then slide one direction to lock. There are pegs on both sides of the door, since it connects to both windows.
The back center section goes on at the same time and is simpler — no pegs. Line it up with the support boards already attached and screw it on.
The glass is very fragile. Have one person hold and guide the door section the whole time, keep it padded, and keep the mallet away from it.
Door: pegs press in, then slide · back center: screws -
Keel stave and floor across the middle
Carry the floor across the door section: 3 wide staves, the keel, then 3 more. The keel stave (bead on both edges) sits in the exact middle of the floor. Past the keel the curves face the other way, so each new stave's cove seats over the bead before it.
The floor is 14 wide staves plus the keel: 7 on each side of it.
New: 3 wide + keel + 3 wide across the middle -
Add the third sections
With the floor past the door, add the third front section (the other window, pegs and slide) and the third back section (screws into its support boards). The end walls are now complete.
New: third front and back sections -
Finish the floor and both bottom curves
Add the last 4 wide floor staves, then the second bottom corner (11 thin staves). You can prop the assembly up to reach more of the curve. The more of the curve you finish now, the less awkward work there is later.
New: last 4 floor staves and the second corner -
Brace the far side with temporary staves
Before standing it up, screw one or two staves across the far end (what becomes the roof) so the front and back stay square and firm. Any stave will do — they come back off later.
New: temporary braces (dashed) at the roof end - Phase B · Walls & roof, upright
-
Stand it upright, on its skids
Roll the assembly up onto its floor. With only about a quarter to a third of the staves on, 2–3 people can lift and shift it into position once it's upright.
Set the four black-painted 4×4s (included) down first, on the pad or wherever the sauna is going to live. They run side to side, evenly spaced from front to back, and the sauna stands up onto them.
Four 4×4 skids, side to side, evenly spaced -
Build up both side walls
Stack 14 wide staves up each side with the bead facing up. Add one on each side in turn so both walls rise evenly. Pull the temporary braces off as soon as they're in the way.
New: 14 wide staves per wall, bead up -
Round the top corners
Continue around both top curves with 11 thin staves each, still bead up and cove down.
New: 11 thin staves per top corner -
Roof staves toward the middle
Work across the roof from both sides: 4 wide staves on each side, seated, tapped and screwed as usual. That leaves 7 for the middle — 3 wide on each side plus the crown.
New: 4 wide staves per side, screwed -
Dry-fit the last 7 staves
Set the remaining middle staves — 3 wide, the crown, 3 wide — in place without any screws, slanted upward so the group sits as a shallow tent above the final line. Slanting them is what lets the last ones in — flat, they'd be too tight to start.
3 + crown + 3 set in dry, slanted up · no screws yet -
Press the group flat, then screw it down
Press the whole group down together until it lies flat and every joint is tight. That pressure is what forces the fit. You can stand on the group to press it down, or work it down with the mallet.
You'll be up on top of the sauna for this, so have the ladder set and a second person steadying it. Now screw all of them down, including the crown. The shell is finished.
Pressed flat and screwed · ring closed - Phase C · Seal, roof & trim
-
Seal the exterior wood (optional, recommended)
Before any roofing goes on, it's worth sealing the outside. We suggest one gallon of Sauna Shield C2 Guard, a sauna-safe natural sealant.
Brush it on generously over all exposed exterior wood with a wide paint brush — one heavy coat, or two quick coats, following the label. One person, 30–50 minutes. Seal before the straps go on.
All exposed exterior wood, wide brush -
Fit and tighten the two metal straps
Two metal straps wrap the sauna and pull the whole shell together. They go on after the sealant and before the barrier and shingles.
Every stave has a screw at each end, so there's a row of screws near the front and a row near the back. Put one strap near each end, lined up to cover that row of screws. Put the tightening mechanism wherever you like, then crank it down hard.
Watch the front walls as you tighten: the strap pulls them together, closes any gaps between staves and brings the door into better alignment.
One strap near each end, over the screw rows · crank down hard -
Water and snow barrier
The peel-and-stick barrier is included; you cut it to size. Measure the front-to-back length and add about 4 inches, so you get a 2-inch overhang at the front and the back.
Cut two pieces, one for each side. Roll each one down the slope, tar side down, letting it hang to where you want the shingles to stop — 65 inches from the ground is a good line. That leaves a gap along the top middle.
Cut a third piece the same length and run it across the top middle, overlapping both side pieces generously. Fold the overhangs tight and staple or nail them . The front and back trim covers them later.
Two side pieces + one across the top · 65 in from the ground -
Shingles
These are hexagonal bitumen shingles — strips with hexagon tabs, the type used on garden buildings. Fasten with roofing nails or staples .
Start at the bottom edge and work up. Stagger the hexagons course to course, and lap each course all the way down to the bottom edge of the one below, so only hexagons show — like the photos.
Nail only in the narrow areas between hexagons. A nail anywhere else won't get covered by the next course, and an exposed nail is a leak.
At the top, cut the last course to meet the shingles coming up the other side, then cap the middle with cut tabs. Warm sun helps the strips bend over the curve and seal down.
How much of each course should show (the exposure), per the supplier's sheet
Bottom course first, overlap upward, cap the middle Photo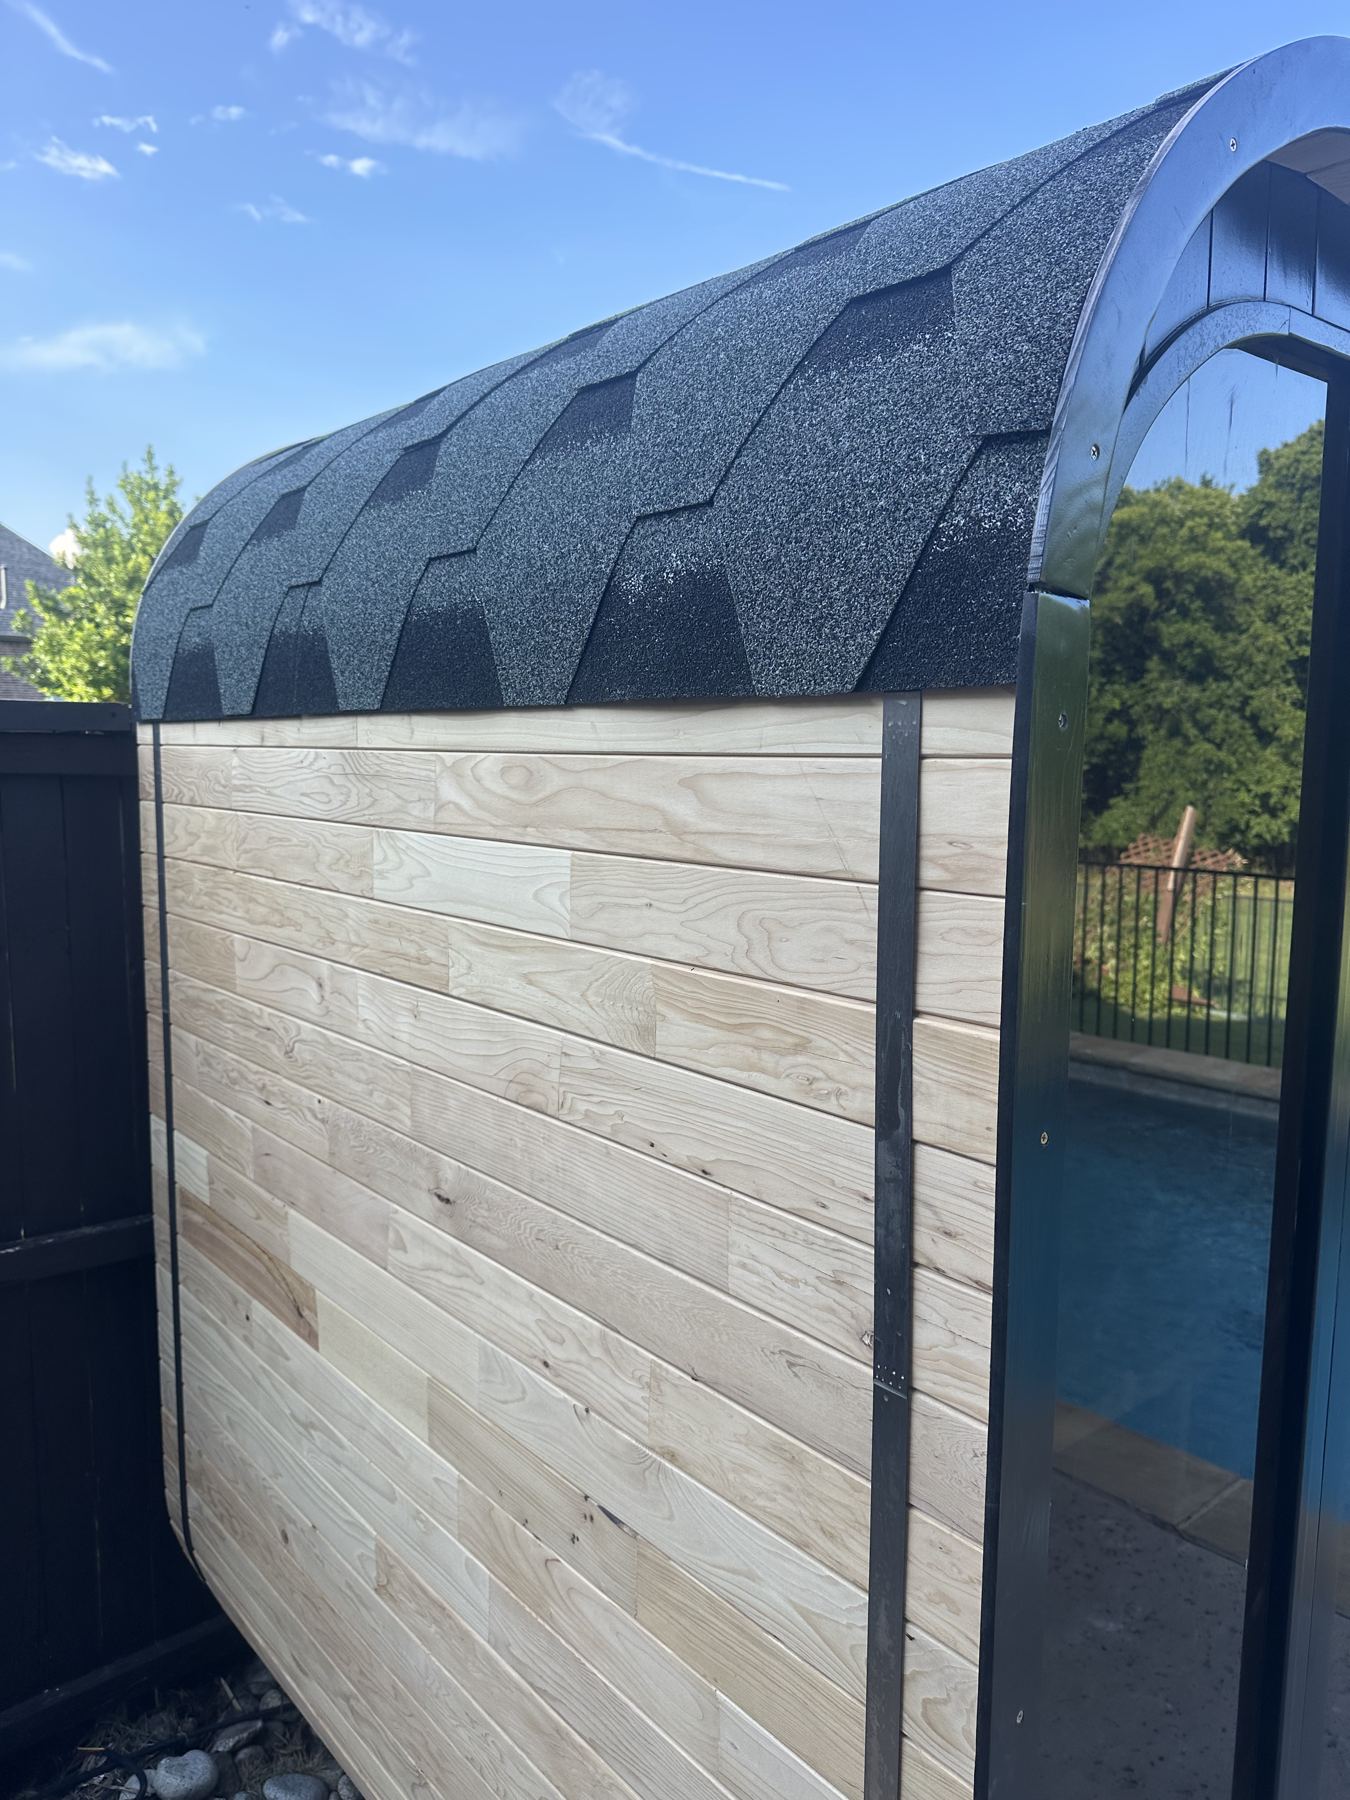
Hexagonal shingles on the finished roof -
Trim the front and back edges
The trim screws onto the front and back around the roof edges and covers the barrier overhang. It looks best with the inside face flush with the staves, so the trim stands proud on the outside. Final placement is the owner's call.
Trim flush inside · proud outside - Phase D · Interior
-
Benches and backrest
Straightforward: screw in the braces on the walls first, then screw the seats down onto them. Two tiers — a lower bench and an upper bench — plus the backrest.
The accent lighting is already built into the seat back. It plugs into the obvious plug; no wiring to figure out.
Braces first, then seats · lights built into the backrest Photo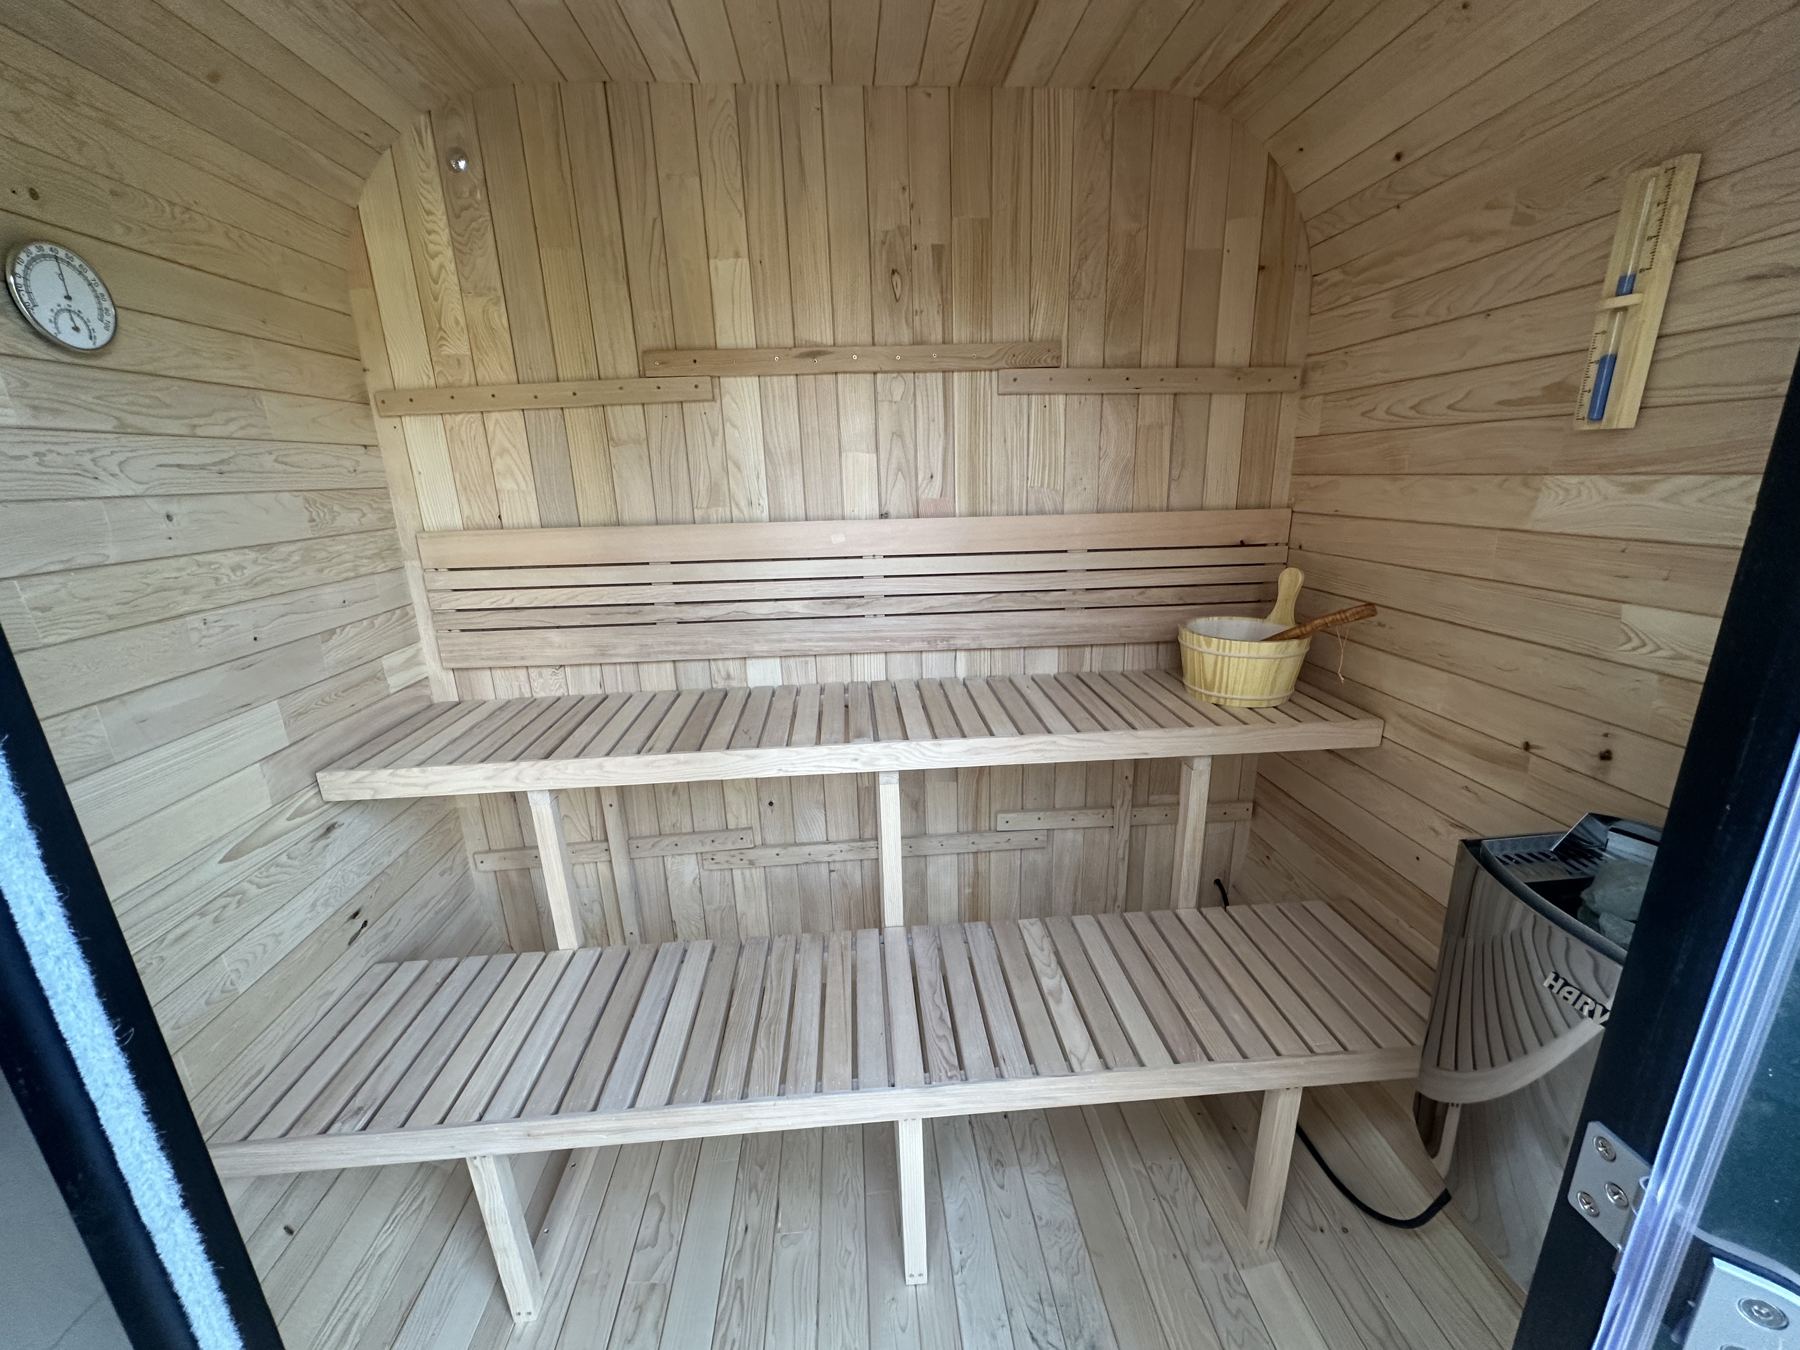
Two-tier benches and backrest, installed -
Mount the heater
Follow the heater's own manual for mounting and clearances. Load the stones as the manual shows.
9 kW · 240V single phase · 50A breaker. A wiring diagram is included. All hookup work should be done by a licensed electrician on a dedicated circuit, to local code.
Electrical9 kW · 240V single phase · 50A breaker. A wiring diagram is included. All hookup work should be done by a licensed electrician on a dedicated circuit, to local code.
Heater per its manual · 9 kW, 240V, 50A Photo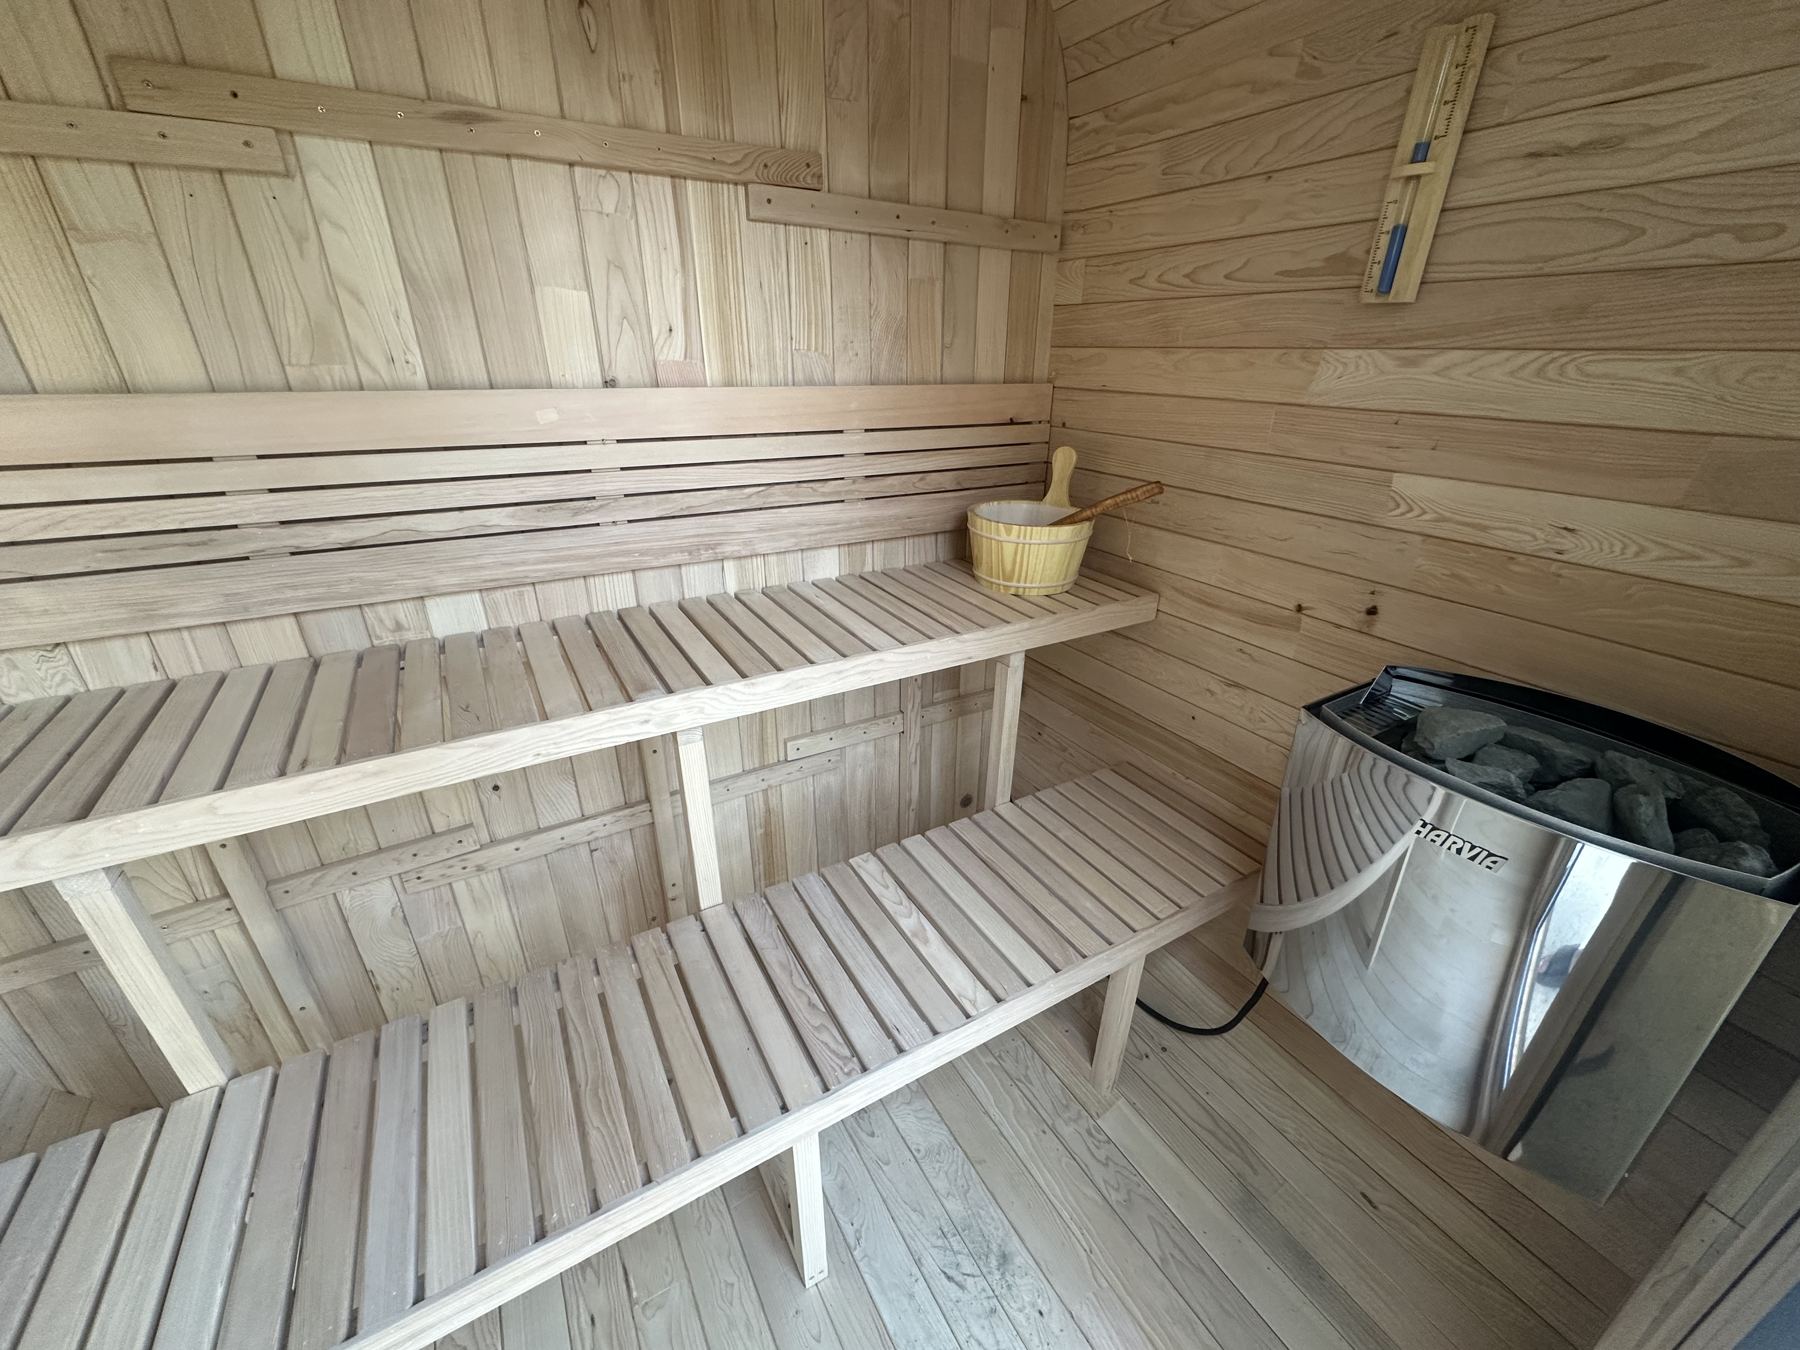
Heater mounted, stones loaded -
Controls, thermometer and timer
The control module (the panel with the blue lighting) runs everything: heat, lights and music.
Put the thermometer on the side wall opposite the heater, at about shoulder height. The timer goes wherever the owner likes it.
Thermometer opposite the heater, shoulder height Photo
Control module: heat, timer, lights and Bluetooth

Do I need a contractor?
No. Two people with basic tools can build the shell. The one job for a professional is the electrical hookup: the heater runs on a dedicated 240V circuit and should be wired by a licensed electrician.
What's included in the box?
The sauna sections and boards, screws, the heater, the four 4×4 skids it sits on, the peel-and-stick roof barrier, shingles, the two metal straps, benches and the control module. Roofing nails or staples and the sealant aren't included.
Is there anything to do after the first heat?
Nothing normally needs tightening. Check the two metal straps and crank them down again if they've loosened at all.
Can you build it for me?
In the Dallas–Fort Worth area, ask us about delivery and installation. Call or text 817-440-4862.

Questions about the build?
Talk it through before you order.
Call or text and we'll walk you through the build, your space and the electrical.